Tag: プログラミング

  • Using Conda Commands on macOS

    Using Conda Commands on macOS

    Here I’ll walk through installing Anaconda on macOS and setting up the terminal environment.

    Installing Anaconda

    Go to the Anaconda homepage and scroll down to find the downloads.

    Choose the installer that matches your environment.
    Since this guide covers macOS, select the 64-bit Graphical Installer.

    Launch the installer and follow the instructions to complete the installation.

    There are two installers for Mac. The 64-bit Graphical Installer installs Anaconda through a GUI, which is the more familiar approach, and unless you have a reason to do otherwise, you can install Anaconda this way.

    The 64-bit Command Line Installer downloads a *.sh file.
    This is a shell script installer, used when you want to install from the terminal.

    Since installing software on Linux is normally done from the terminal, people who are used to Linux may find this route easier. (Probably.)

    Setting up the command line

    When you install on macOS, all that appears in your applications list is Anaconda-Navigator, and as it stands you can’t use Anaconda or Python from the terminal.

    If you want to use the conda command, for example to install packages, you need to activate Anaconda.
    To activate Anaconda (that is, to make the conda command available):

    conda activate

    Run the above.
    The conda command should now work.

    If activating the conda environment every time is a hassle, you can have it activate automatically.
    To do so, run the following in the terminal:

    ~/opt/anaconda3/bin/conda init シェル名

    Use the name of the shell you’re actually using. If you have no idea and have never touched this setting, you’re most likely on the default shell (zsh on macOS), so substitute that for the shell name.

    ~/opt/anaconda3/bin/conda init zsh

    Now, when you restart the terminal, the conda environment will be activated automatically and you won’t need to type conda activate.

    To turn off automatic activation,

    conda config --set auto_activate_base false

    run the following in the terminal.

  • Arithmetic Operations in Bonsai

    Arithmetic Operations in Bonsai

    Bonsai is widely used for designing experiments in neuroscience and other fields.
    With Bonsai you can build sophisticated programs without writing code, and run them with precise synchronization.

    Because it is so simple, however, operations that would be trivial in ordinary programming—such as basic arithmetic—have to be done in a somewhat unintuitive way.
    Here I explain how to perform arithmetic in Bonsai, using MouseMove as an example.

    Below is what these arithmetic operations actually look like: from top to bottom, addition, subtraction, multiplication, and division.

    For clarity, I used the X and Y values of MouseMove as the example here.
    In practice, though, you can perform calculations on values obtained from other sensors as well.

    The key point in Bonsai is that, before performing an operation, you need to combine the two values using “Zip”.

    The contents of “Zip” take the form (value 1, value 2); its role is to bundle the two values at that moment into one.
    Each operation then computes on value 1 and value 2 accordingly.

    This is hard to explain in words, so try to get a rough intuition for it.
    Without “Zip”, the program would not know which value to multiply with which, so the calculation could not be performed. That is why the X and Y values must first be combined so that they correspond to each other.

    The names of the operators for each arithmetic operation are listed below.

    • Addition => Add
    • Subtraction => Subtract
    • Multiplication => Multiply
    • Division => Divide

    I have posted a demonstration below, so please take a look.

    <Example in action>

  • I Don’t Really Know Much, But I Want to Program in Python! (1)

    I Don’t Really Know Much, But I Want to Program in Python! (1)

    When you start learning programming, I think the first hurdle is figuring out where to begin.
    You search online, but then what? What software are you even supposed to use to write your code?

    I struggled with exactly that myself.

    Broadly speaking, there are two kinds of tools for writing programs.
    One is interactive, and the other is script-based. (I’m putting it this way for clarity. I’m not entirely sure it’s the correct terminology, though…)

    With the interactive type, you type one line and get one response back
    —you write and run the program one line at a time, over and over.

    With the script type, it’s like writing a whole essay and then getting feedback on it
    —you run the entire program at once.
    This script type is what most people picture when they think of programming: page after page of cryptic-looking code.

    The problem is, when you set out to write a script-type program, what software should you actually use?

    On top of that, beginner-level programming lessons often use the interactive style, but at the intermediate level you’re suddenly writing script code, and what to write it in is either left unstated or differs completely from book to book.

    For the interactive style, you use something already built into your computer, like Command Prompt or Terminal, and get started by typing “Python”.

    But what do you write script-type programs in?

    Most script-type programs are written in an IDE (integrated development environment). (When in doubt, searching “Python IDE recommended” will turn up plenty of articles.)

    The tools I normally use for writing script-type programs are
    Jupyter Notebook and PyCharm.
    (Apparently people are split on whether “Jupyter” is pronounced “joo-pih-ter” or “joo-py-ter”.)

    I use Jupyter Notebook for statistical analysis and plotting graphs, and PyCharm for driving hardware or writing more complex programs.

    Let me describe what each one is like.

    First, Jupyter Notebook.
    It comes bundled when you download Anaconda.
    When you launch Jupyter Notebook, a browser such as Safari or Firefox opens first.

    A list of the files on your computer is then displayed.
    Open the folder you want, and click “New” in the upper right.
    Then click “Python 3” and a screen like the image below will open.
    Saving this file gives you a *.ipynb file.

    You write your code in individual cells, and by clicking the RUN button at the top you can execute the program cell by cell.

    Being able to run code one cell at a time is a huge advantage when making graphs or doing statistics.
    That’s why I use it so often.

    I use PyCharm when opening *.py files.
    Note that the two tools open different file types, so be careful.

    For PyCharm, please refer to other sites.
    (I haven’t used it much yet, so I plan to cover how to use it in detail in a future post.)

    The Anaconda site is here

    The Jupyter Notebook site is here

    The PyCharm site is here
    For the download, choose the gray Community edition rather than Professional—that’s the free one.
    I’d recommend starting with that.

    I’ve been using Jupyter Notebook a lot lately, so I plan to keep posting updates, both as notes on my own learning and for anyone who wants to learn to program.

  • Bonsai as a visual programming language

    Bonsai as a visual programming language

    Bonsai is a visual programming language introduced in a 2015 paper.
    It allows you to acquire data from sensors and process it at the same time.

    A key feature of Bonsai is that complex processing pipelines can be assembled easily, much like putting together a puzzle, and the results of that processing can be checked in real time.

    Bonsai can also be combined with other analysis software (DeepLabCut, Open Ephys, BonVision, and so on) and with hardware (cameras, controllers, microcontrollers, etc.), making it highly extensible.

    Because you can carry out complex analysis and processing intuitively without having to learn a programming language that looks intimidating, anyone can use it easily, and it broadens the range of experiments you can run.

    The paper describing Bonsai is available here.
    You can install Bonsai from here.

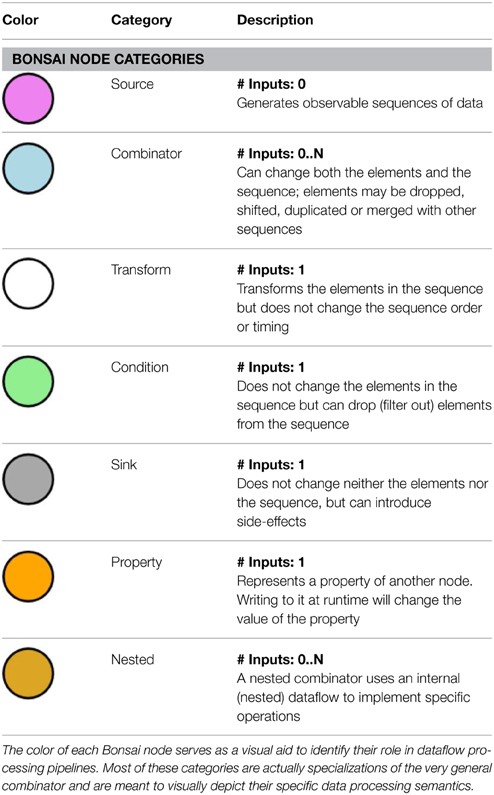
    Image taken from the paper.
    Each circle is called a node and represents an individual operation.

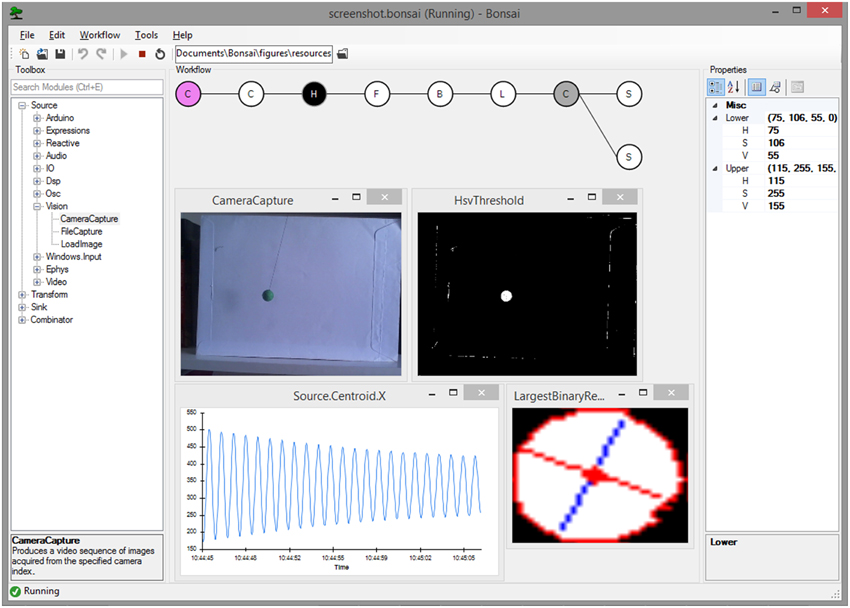
    This is what the screen looks like when Bonsai is actually running (taken from the paper).
    On the left you can search for nodes and add the one you need; in the central panel you arrange nodes to build up a pipeline while visualizing what it does; and on the right are the detailed settings for each node.

    The windows popping up in the main panel show the execution status of each node; for a camera capture node, for example, the live camera image can be displayed.

    It may look difficult at first glance, but seen this way it turns out to be surprisingly straightforward.

    Now let’s actually install it.
    That said, all you need to do is download it from this site.
    Just open the downloaded “Bonsai-*.*.*.exe” file and run the installer.
    Note that security software such as Trend Micro may block the installation.

    Once Bonsai is installed, both Bonsai and Bonsai (x86) will appear in your list of applications.
    For normal use either one is fine, but occasionally one of them will fail to run; in that case, trying the other one often works.

    One drawback is that Bonsai currently runs on Windows only, and is not supported on Linux or macOS.
    That may change in the future, but it is something to keep in mind.

    From the next post, I’ll start actually using Bonsai.